
Blue Screen vs Green Screen: Which Should You Use?
Compare blue screen vs green screen by clothing, light, spill, and fine detail. See which backdrop to test—and how to spot a key that damages your subject.
For most digital video shoots, a green screen is a sensible starting point—unless something you need to keep is green. Choose blue when green clothing, a product, or foliage must stay in the shot. Blue can also help with some spill-sensitive setups, but it still needs proper lighting. Start with the colors you need to keep, then check your lighting and a short test composite. Neither color guarantees clean hair or motion edges.
Before you buy a backdrop, put the actual outfit and props together. A green logo on an otherwise black shirt can matter more than the camera you own.
How blue and green screens work
Both use chroma key: your editor selects a background color and makes matching areas transparent so another image or video can show through. The key usually includes a range of colors, since a photographed screen rarely records as one perfectly uniform shade.
That selection does not automatically know which green pixels belong to the wall and which belong to your shirt. A color match can remove part of the subject too. Blue and green are common choices because they can provide useful separation from human skin tones; neither is a universal choice for every costume or object.
The resulting transparency is often called a matte or alpha channel. In an alpha view, solid white usually means fully visible, black means transparent, and gray means partially transparent. A checkerboard in a composite preview represents transparency; it is not a background you want baked into the export.
Blue screen vs green screen at a glance
| Factor | Green screen | Blue screen |
|---|---|---|
| Must-keep colors | Useful when your subject includes blue | Useful when your subject includes green |
| Lighting budget | Usually easier to illuminate with limited lighting | Generally needs more light to expose the screen well |
| Reflected color | Watch for a green cast on hair, skin, or reflective edges | May reduce troublesome green spill; blue spill is still possible |
| Dark final scene | Usable if you control spill and match the subject lighting | Worth testing when bright green bounce would fight the intended look |
| Hair and fine detail | Test pale hair, translucent edges, and motion | Test the same details; blue is not an automatic fix |
| Main reason to reject it | Green details disappear or spill cannot be controlled | Blue details disappear or the screen is difficult to expose cleanly |
With limited lights, green is often the easier backdrop to start with. Leave room between the subject and screen so reflected green does not create extra cleanup work.
When a green screen makes sense
Start with green for a typical talking-head video when the clothing and props do not conflict. A presenter in a blue shirt is an obvious case: blue is something you want to preserve, so green is the first backdrop to test.
Green is also worth trying when you have limited lighting equipment. Spend the effort on an even screen and enough separation from the subject rather than buying a second backdrop immediately. A cheap backdrop with manageable wrinkles and controlled light may be more useful than an expensive one squeezed against the presenter.
For a product video, check the whole object. A mostly white package can still carry a green label that you need to keep. Rotate reflective packaging during the test; its recorded color can change as it catches light from the screen.
When a blue screen makes sense
Use blue when green must remain visible. That might be a green uniform, a plant in a demonstration, or a product whose color is part of the reason you are filming it. Changing the backdrop is often simpler than repairing a missing part of the subject frame by frame.
Blue is also a candidate when reflected green is especially troublesome. Pale hair can pick up the screen's color, and a darker final scene may make that cast distracting. Test blue against the actual replacement background rather than assuming it will produce a cleaner result.
A dark final scene does not mean an underexposed screen. You need enough usable color information to remove the backdrop while lighting the subject to fit the finished scene. Do not reduce all the lights just because you chose blue.
If the subject contains both blue and green, pause before buying either. Change a removable prop or outfit if possible. For footage you cannot reshoot, a hold-out matte can protect a same-color part of the subject. That is extra compositing work, not something a backdrop swap always eliminates.

Lighting and spill matter with either color
Light the screen for even color; light the subject for the scene you are building. A bright hotspot and a deep shadow give the keyer a wider set of colors to remove. Keep wrinkles and cast shadows out of the useful background area where you can.
Give the subject room in front of the backdrop. More separation can help reduce reflected screen color and keep the subject's shadow off the screen. There is no single distance that fits every room: frame the shot first, then move the subject and lights while checking the camera image.

Notice the space around the performer. Plan where the camera and lights will go, not just where the backdrop fits.
If the subject is still solid but has a green or blue fringe, try spill suppression. Making the edge more transparent can erase detail without fixing the color cast. If the shirt itself has become transparent, check the matte and selected color range first.
For hair, glass, and fast movement, judge the moving clip as well as a paused frame. Edit from the original camera file where possible. Heavy compression can discard color detail that you need to separate fine edges from the screen.
Why turning up the key can make the shirt disappear
You select the screen color. A darker patch remains. You widen the selected color range until the patch goes away—and now part of the shirt is missing. At that point, you need to improve color separation, not just keep adjusting the key.
We ran a small synthetic color-key demonstration to make this tradeoff visible. Three simple images used the same figure: an even green backdrop with a green shirt, a backdrop with a wider range of greens, and that same wider-range backdrop with only the shirt changed to purple. We processed them with FFmpeg's color key, keeping the selected green and edge blending fixed while increasing the color range.
With the wider-range background, a narrow selection preserved the green shirt but left a background patch. A wider selection cleared the patch and removed the shirt. Changing only the shirt to purple let that same wider setting clear the background while keeping the shirt.
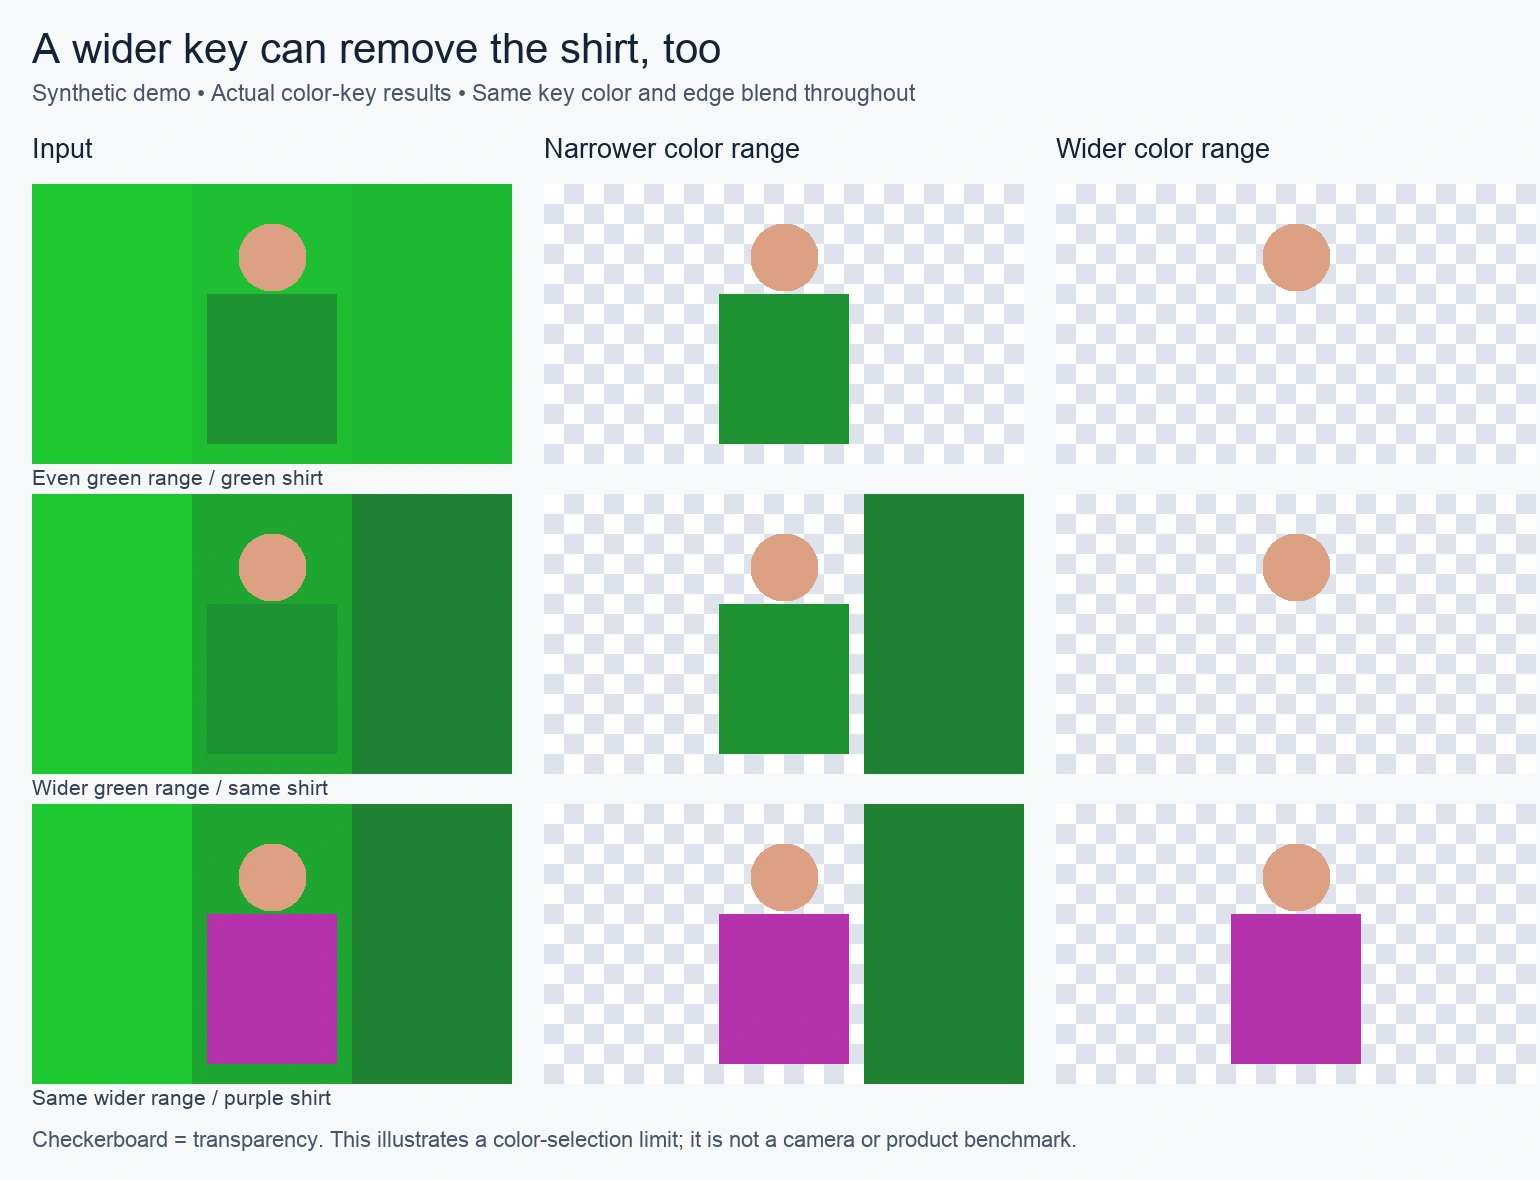
Compare the middle and bottom rows: the wider selection is the same, but the shirt color changes. Checkerboard areas are transparent. Open the image to inspect the detail.
This illustrates a limit of global color selection. It does not compare real blue- and green-screen footage, simulate camera lighting, or measure VideoBGRemover's AI. The useful lesson is to check the subject while cleaning the background—not just celebrate when the green disappears.
| What you see | What to check first | What to try next |
|---|---|---|
| A hole in clothing or a prop | Does the missing area resemble the selected screen color? | Narrow the selection and watch for recovery. Before filming, change the conflicting color; for existing footage, consider a protective mask. |
| Background patches remain | Are they opaque in the matte, and different from your sampled color? | Check the sample and matte settings. During setup, improve background consistency before relying on a broader key. |
| The subject is intact but has a green or blue rim | Is this a color cast rather than unwanted transparency? | Adjust spill suppression and inspect the edge against the replacement background. |
Record a short test before the full shoot
You do not need to record the whole script to test your setup. Make a roughly 10-second test using the final outfit, actual props, and intended camera settings. This is a suggested check, not a duration required by any tool.
- Include the difficult movement. Turn the head, move a hand across the body, and rotate a reflective object if the real shot includes one.
- Use the editing workflow you intend to finish with. Select the screen color, inspect the matte, and place the clip over the intended background. A light and a dark temporary background can help reveal different edge problems.
- Inspect the parts you must keep. Check the logo, fine hair, and moving edges. If background cleanup starts deleting those details, return to the setup or use a more selective masking approach.
- Repeat after a meaningful change. Compare the same motion after changing the outfit, light placement, or backdrop. Keep the version whose actual result needs less repair.
What if the footage has no colored screen?
A blue or green backdrop is a capture choice; it is not a requirement for every background-removal method. AI removal tries to separate the subject from the scene without selecting one screen color.
For an existing clip, you can try VideoBGRemover's video background removal workflow and inspect the result before committing to the edit. It supports ordinary backgrounds as well as screen footage, but does not provide the manual chroma-key controls described above. Fine transparent objects and difficult motion still deserve a close check.
If you need to carry the cutout into another composition, see how to create transparent video. Use transparent WebM when the receiving editor supports it; a background MP4 is for a finished replacement background, not an alpha cutout.
Common questions
Is blue screen better than green screen?
There is no overall winner. Green is a common starting point for digital shooting; blue is useful when green must stay in the subject or green spill is troublesome. Choose using your actual outfit, lighting, and test composite.
Why do filmmakers still use blue screens?
A shot may include green objects or need a different spill tradeoff. Blue also has a long filmmaking history. Its continued use does not mean it is inherently more professional or always better for fine detail.
Can I use a blue or green wall instead of a screen?
Yes, a sufficiently consistent color can be keyed. A wall still needs suitable lighting, and texture, gloss, or shadows can complicate the result. Test the wall in the actual framing before preparing a whole shoot around it.
Choose the color that leaves your subject easiest to preserve. Then test the hardest part of the shot before recording the rest.
Author

Categories
More Posts

How to Blur Background in Video: Online, CapCut, and Desktop
Learn how to blur background in video while keeping the person clear. Follow online and CapCut steps, with real examples and screenshots of the editing controls.

How to Blur a Face in a Video: Online and Manual Steps
Blur faces in a video online or with a moving mask. Follow the steps for computers, iPhone, Android, and YouTube, then save and check your finished video.

ProRes 4444 vs 422: Quality, Alpha, and File Size
Compare ProRes 4444 vs 422 for image quality, alpha channels, and file size. Choose an editing or transparent handoff format without wasting storage.