
What Is a Green Screen? How It Works, Uses, and Setup
Learn what a green screen does, how chroma keying replaces a background, what you need to get started, and how to fix common problems—with a real footage example.
A green screen is a plain green backdrop used when filming or taking photos so that software can replace the background. The software removes the green through a process called chroma keying, leaving the person or object visible over a different image or video.
Think of a weather presenter standing in front of a map. The presenter can be filmed against a green wall while the map is added electronically. The camera still records the green backdrop; the software creates the finished picture.
How does a green screen work?
A green-screen shot combines two separate pictures: the subject you filmed and the background you want viewers to see.
- Record the subject against green. The screen fills the area behind the person, including where their hands move.
- Make the green transparent. Apply the editor's green-screen or chroma-key effect. It identifies the chosen color and removes it from the shot.
- Put another picture behind it. Place your new background underneath the subject's clip. The lower picture shows through the areas that became transparent.
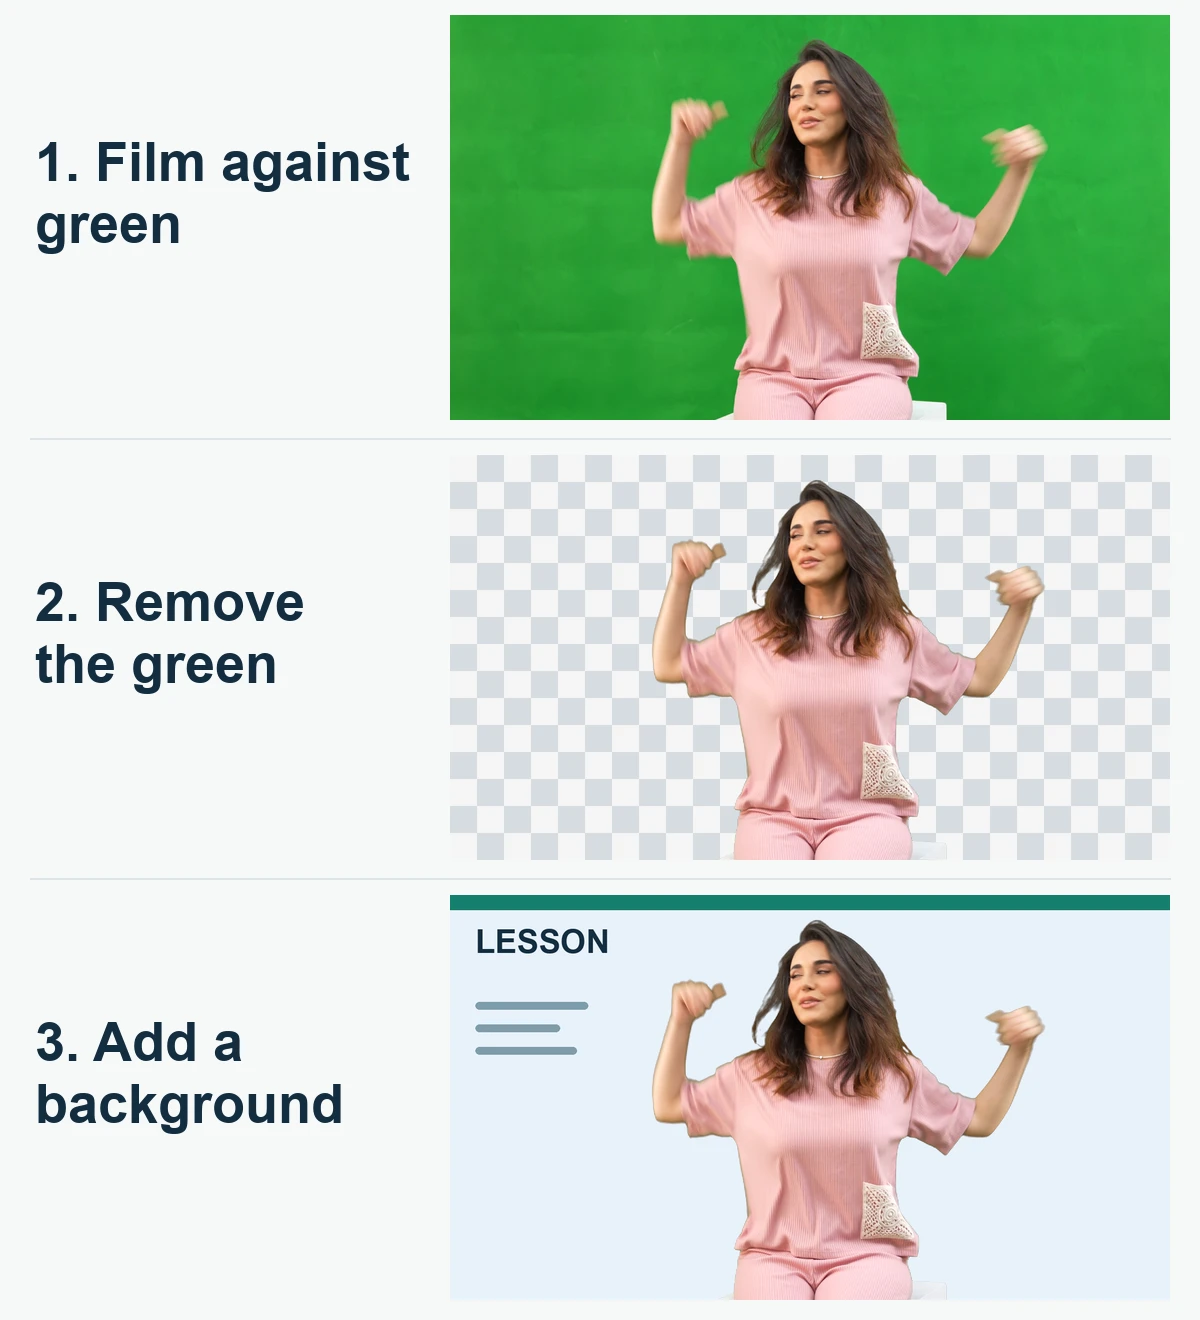
The same filmed subject at each stage. The checkerboard represents transparency; the final background is an illustrated teaching slide. Footage: Jabeer Alhassan / Pexels, edited for this example.
The combined picture is called a composite. You can make it during an edit or in real time for a broadcast. The essential order stays the same: keep the subject in front and place the replacement behind it. Apple's iMovie guide shows this arrangement with the green-screen clip above the background clip.
What is a green screen used for?
Green screens let you record the subject separately from the setting. Common uses include:
- Movies and visual effects. An actor can perform on a controlled set while an imaginary location, dangerous environment, or larger scene is added later.
- Weather reports and lessons. A presenter can appear in front of a map, diagram, or slide without physically standing in front of a display.
- Gaming streams and creator videos. Removing the area around a webcam subject lets the game or other content remain visible behind them.
- Product videos and photography. A separately filmed object can appear against a new color or layout, provided the object itself stays distinct from the screen.
A green screen changes what surrounds the subject. It does not automatically make the new setting believable. A person lit from the right can look out of place in a scene with strong sunlight from the left, even when their outline is clean.
Why is the screen green?
Green is useful because it is usually easy to distinguish from skin. A strong, consistent backdrop color gives the software something specific to remove.
But the software selects colors, not “the wall.” If your shirt matches the green screen, parts of the shirt may disappear too. The same issue applies to a green prop you want to keep.
Blue is another common backdrop color. Choose a screen that is different from the important colors in your subject: a green costume may call for blue, while blue clothing may call for green. The replacement background can contain either color because it is a separate layer. Our blue screen vs green screen guide explains the choice in more detail.
What do you need to use a green screen?
You need a suitable backdrop, a way to record the subject, and software that can remove the backdrop color. A large studio is one option; a small seated shot needs much less space.
| Item | What to look for |
|---|---|
| Green backdrop | Smooth, matte fabric, a pop-up panel, or a painted surface. It should cover the entire area behind the action. |
| Camera or phone | A clear, steady recording with the subject in focus. A tripod helps keep the framing consistent. |
| Lighting | Even light across the screen, with the subject lit to suit the new scene. Avoid a strong shadow directly behind the person. |
| Room to separate the subject | Enough space to reduce shadows and green light reflecting onto skin, hair, or clothing. |
| Editor with chroma key | A green-screen effect and controls for refining the removed area and edges. |
| Replacement background | An image or video that fits the shot, or a graphic such as a lesson slide. |
Before buying a larger screen, frame the shot you actually need. A head-and-shoulders video needs coverage behind the head and shoulders; a full-body performance also needs coverage around moving arms and feet.
How to make your first green-screen video
1. Set the scene before recording
Choose your replacement background first so you can plan the subject's position and lighting. Smooth the backdrop, frame the camera, and check that the screen extends behind the entire movement you want to film.
Leave space between the person and the screen. Light the backdrop evenly, then light the person for the scene they will appear in. Adobe's filming guidance explains why lighting these separately helps avoid a patchy key and green reflections.
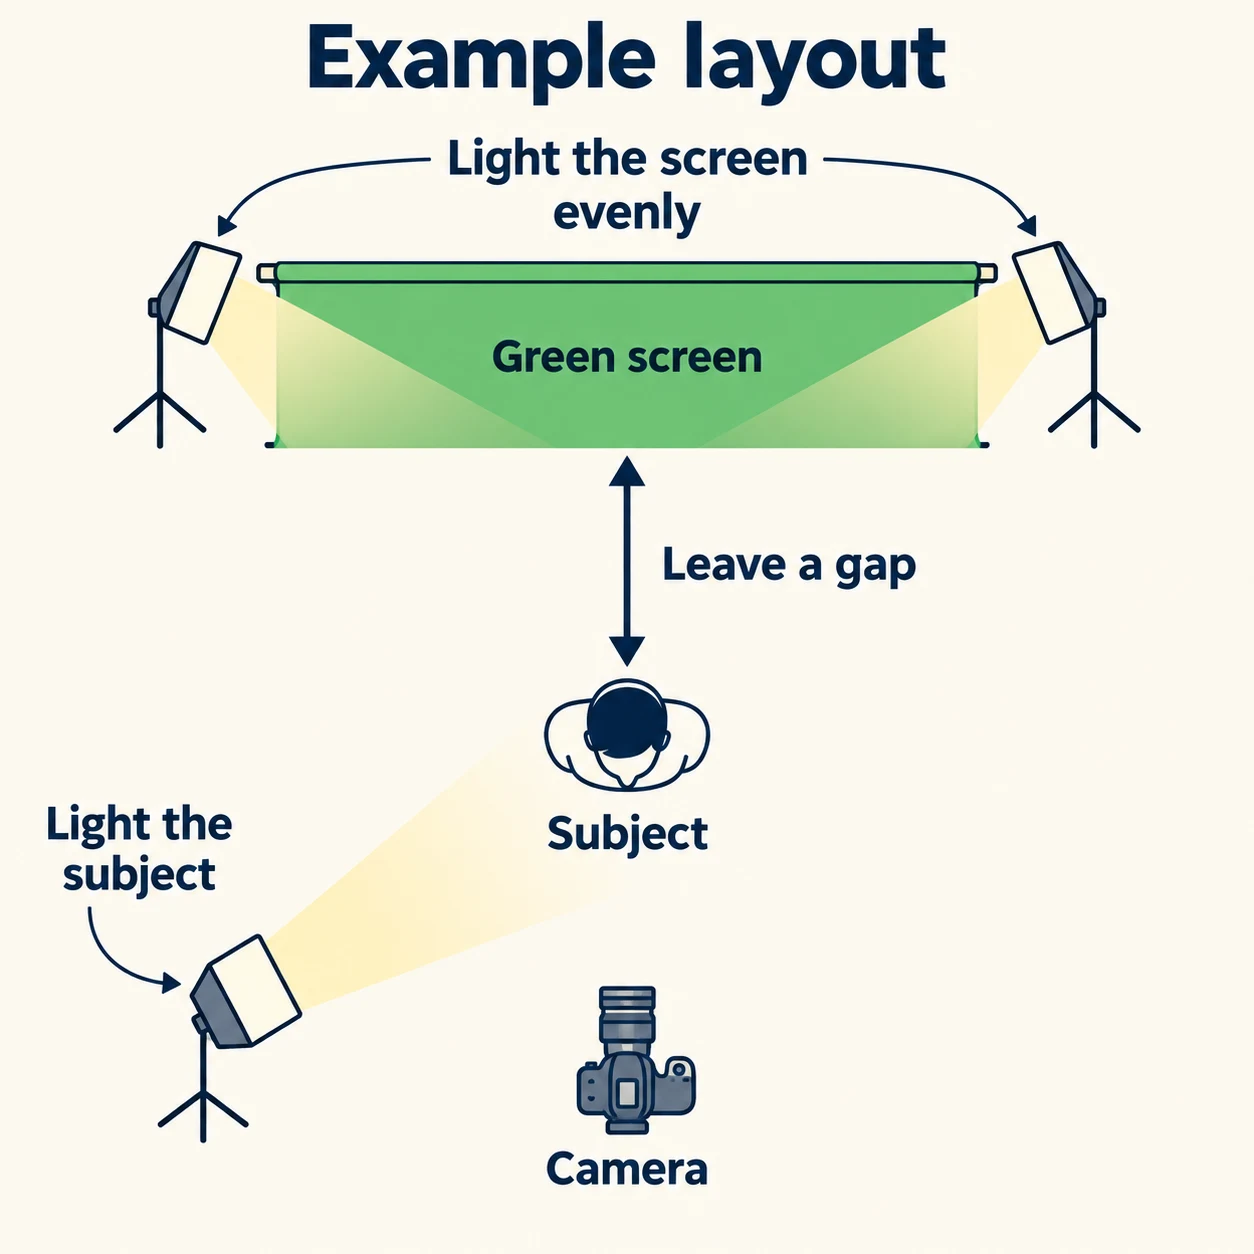
Example layout: leave space behind the person and light the backdrop separately. Adjust the setup to your room and shot.
2. Record a short movement test
Check clothing and props for the screen color. Record a few seconds that include the movements you plan to use: turn your head, gesture, or lift the product. Review that clip before recording the full take.
This catches a hand moving outside the backdrop, a shadow crossing the screen, or an edge that looks fine while still but becomes difficult to remove in motion.
3. Add the background and remove the green
Put the replacement image or video on the lower layer of your editing timeline. Place the green-screen clip above it and apply the editor's chroma-key effect. If there is a color picker, select a representative part of the screen.
You should now see the lower image around the subject. If the background stays green, check that the keying effect is enabled on the subject's clip. If it turns black, check whether the lower background layer is present and visible.
4. Refine the person, then preview the whole clip
Adjust the key until the backdrop clears, watching the subject at the same time. If hair or clothing starts becoming see-through, back off. A green outline around otherwise solid hair needs a different check from a patch of screen that has not disappeared.
Play the short clip over your intended background before exporting. Look for changing edges around moving hands and hair, then check that the subject's size and lighting fit the scene. For the controls in a specific editor, follow our Premiere Pro or DaVinci Resolve tutorial.
Common green-screen problems and what to check
Start by identifying where the problem is. Leftover backdrop, unwanted green color on the person, and missing parts of the person need different adjustments.
| What you see | What to check first |
|---|---|
| Patches of green remain behind the subject | Check the sampled color and the key's removal range. For a new shoot, smooth and evenly light the screen. |
| The backdrop is gone, but hair or skin still looks green | Try spill reduction, which reduces unwanted green color on the retained subject. |
| Hair or clothing becomes see-through | Reduce the removal range and check whether the subject contains the screen color. |
| Hands or hair look rough during movement | Inspect the moving section, not just a paused frame. Check the original for motion blur before trying to fix everything with the key. |
| The cutout looks pasted into the scene | Compare the subject's lighting, scale, and camera angle with the background. Removing green does not fix a mismatch between the two shots. |
A wider removal range is not always the fix for green edges. We keyed a five-second live-action clip and compared the same moments as the subject moved. Increasing the range made the hair see-through while some green remained. Returning to the gentler key and applying separate spill reduction reduced the green outline without removing more of the subject.
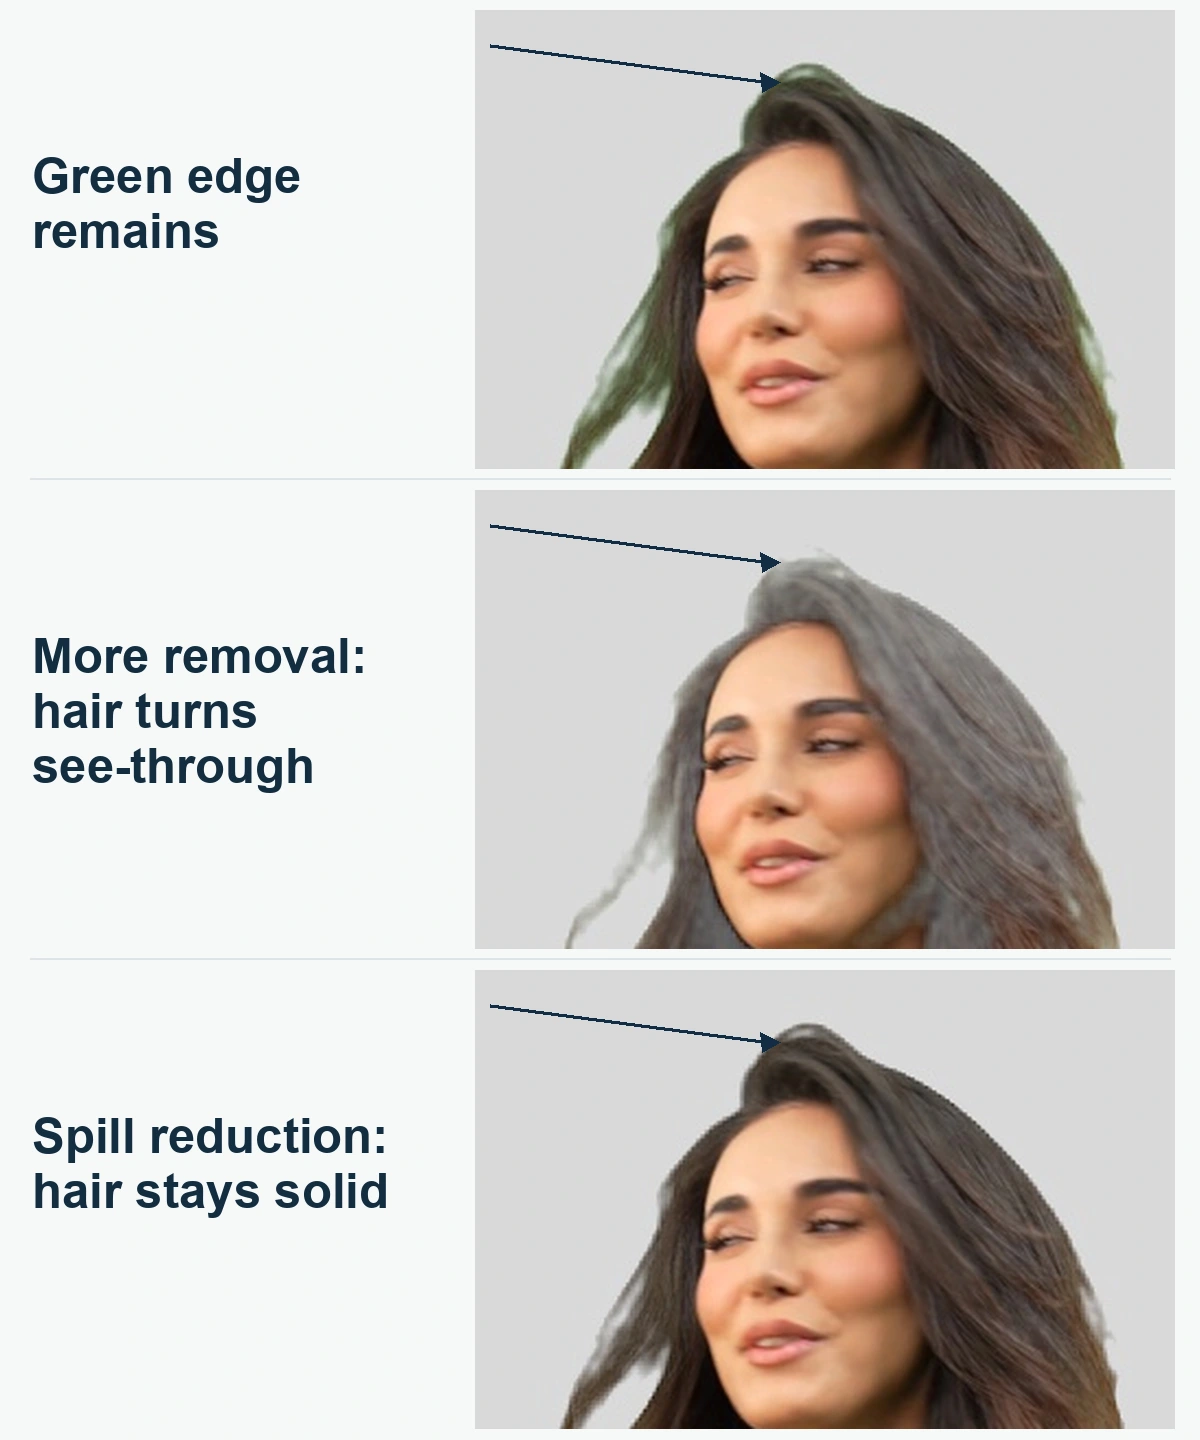
Same frame, same background. Notice the hair at the top and left of the head. Crops from the Pexels clip above; color-key and spill adjustments made for this comparison.
If your backdrop has already disappeared, restore the last setting that kept the person intact and try the editor's spill control before increasing removal further. Check skin and hair as you adjust. OBS documents these as separate controls: similarity changes which colors become transparent, while spill reduction targets traces of the screen color around retained edges.
Do you need a green screen?
Use a green screen when you can plan the recording and want to replace the setting with a color-key workflow. It is especially useful when you will film the same kind of shot repeatedly and can keep the backdrop and lighting consistent.
For video already filmed in a normal room or outdoors, AI background removal or manual masking can separate the subject without a green backdrop. These methods work differently from choosing one screen color to remove.
For footage already shot against green, our chroma key remover lets you work with the screen color. For existing footage with an ordinary background, start with AI video background removal.
Before your next full recording, make a short test, replace the background, and watch the result. That gives you a chance to fix the shot while the camera and lights are still set up.
Author

Categories
More Posts

How to Remove a Green Screen in Premiere Pro (2026 Guide)
Learn how to remove a green screen in Premiere Pro with this 2026 guide to Ultra Key. Clean up edges and green spill, add a new background, or export a transparent ProRes 4444 clip.

How to Remove a Green Screen in DaVinci Resolve
Remove a green screen in DaVinci Resolve with Fusion's Delta Keyer, refine the matte and spill, then composite a background or export transparency.

How to Remove Background from Video: A Step-by-Step Guide
Learn how to remove background from video with AI, check moving edges, and choose transparent WebM or a background MP4. Includes a real desktop walkthrough.